Whether you are printing a report, the query is the way in which you communicate with your computer which members to select from the database.
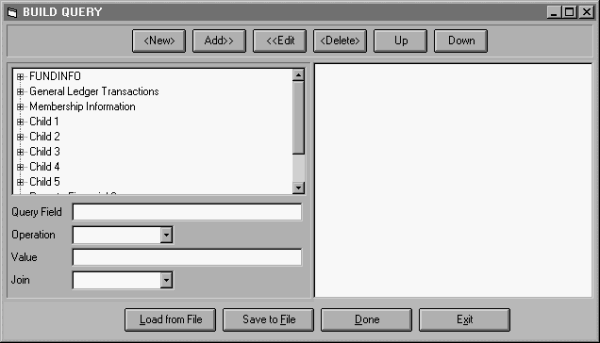
Access the ReportWriter screen by selecting Membership List Reports from the Reports sub-menu. Access the query screen by selection [Edit] then [Record Query] to see the following screen:

On this screen, all of the categories you can query by are organized into the folders shown above. Whichever category you are going to query by, such as Age, you would look for it under one of these folders and click it so that it appears in the query field. Your screen may not show all of the folders because new ones are added when you run Build Financial Summary Database or Build Family Database.
Before beginning to build your query, it is a good idea to do two things:
1. Decide which members of the congregation should be included on the report.
2. Determine how those members are represented in the system - how
are their membership screens different from everyone else's? How are
they differentiated during the data entry process?
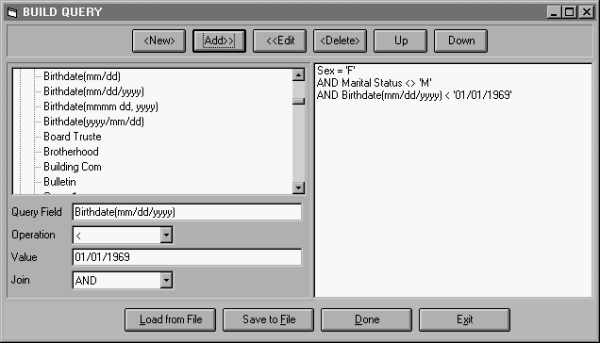
For example, if you want to print a report for all single women over 30 - these women are represented in the system by having "F" in the Sex field, "S", "W", or "D" in the Marital Status field, and a Birthdate prior to 1969 (or the appropriate year). These fields all happen to be Membership fields (as opposed to Participation or Checklist fields) so you would click on the plus sign to the left of the Membership folder to open it. To query by a particular field, highlight the field and click so that it appears in the Query Field box. Then we set the field equal to some value (or greater than, etc.) using the Operation and Value fields. Our first example would be Sex = F so we select the "=" from Operation and type in the Value as it appears on the membership screens for this query, an "F." For most queries, the join will be AND so we would select that here. Click <Add> to view the line of query on the right-hand side of the screen.
For the second line of query, to make it easy on ourselves, we will enter "Marital Status <> M" which means Marital Status is not equal to M. Since there are only four possibilities for Marital Status in TempleTracker (S,M,W,D) and we want all but one, the <> sign works best in this case.
For the Birthdate, we will select Birthdate(mm/dd/yyyy) < 01/01/1969. For date fields, the format of the Value must match the format of the field as shown in parentheses. This line of query will pull everyone born before Jan. 1, 1969, or all those over 30. Clicking <Add> after each line of query is entered results in a screen that looks like the one below:

At this point, we would click <Save> and proceed with printing statements or labels, or with global assessments. The system would scroll through the records and pull out only those which met all of these records SIMULTANEOUSLY (because we used AND as the join). Another way to look at it is that the computer limits the database by the first line of query so that the subset includes all women. Then it looks through all of them and finds anyone without an M in Marital Status. Now the subset is smaller. Next it searches this smaller subset for anyone over 30. The system then performs the action requested (printing labels, statements, etc.) for the resulting subset.
Another typical query would be "All Heads of Household" if you are printing labels or a membership list. Head of Household is designated in TempleTracker by Member Code of A. To enter this query, click the plus sign next to the Membership folder and click Member Code so that it appears in the Query Field box. Set the Operation to = and the Value to A. Use a Join of AND and click <Add> to move the line of query to the right hand side of the screen. Click <Save> and proceed with label printing, etc.
More Information on Queries:
Querying by a Checklist Field:
If one of your user-defined Checklist fields in TempleTracker is Sisterhood and you want to print a report with the names and phone numbers of all Sisterhood members, you would set your query to read "Sisterhood = 1." For checklist fields, 1 is the value of a checked field and 0 is the value of an un-checked field. Also valid for Checklist Queries are Sisterhood = Y or Sisterhood = T (for true).
Working with an AND/OR query:
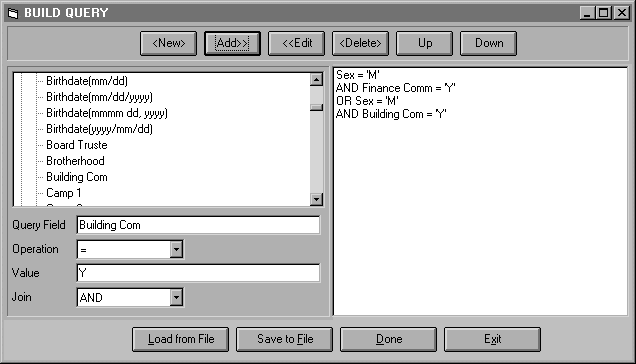
The main thing to remember when creating an AND/OR query is that each time the computer reads an "OR", it will effectively draw a line at that point in the query and search for everything that meets the criteria above the OR and add those records to all of the records which meet the criteria following the OR. For example, if you want to select every male on the Building Committee or on the Finance Committee, your query should select all men on the Building Committee then join that with all men on the Finance Committee (therefore, the criteria Sex = M must appear twice in the query - see below:

If you were to draw a line at the OR, the query will find all men on the Finance Committee and add them to the report. It will join with those all men on the Building Committee and add them to the report. It will then sort all of the records together by the primary sort (designated on the graphical display).
Which Date Format to Use:
For both the Built-In date fields (Birthdate and Member Date) and the three User-Defined Date fields (Membership fields 4, 5, and 6) there are four different formats you can use when inserting the date onto the report through [Insert] [Data Fields] and when building the Query through [Edit] [Record Query]. These are as follows:
|
mm/dd |
10/03 |
|
mm/dd/yyyy |
10/03/1999 |
|
mmmm dd, yyyy |
October 3, 1999 |
|
yyyy/mm/dd |
1999/10/03 |
When creating a birthday list for all members born in October (regardless of the year), select the first option for the Query. Then select either the first, second, or third for the Report Display depending on how you would like the birthday to be displayed. For example, you may want the birthday in the (mm/dd) format or you may want it written out on the report October 3, 1999. If you want the latter for the display, select the third option (mmmm dd, yyyy) from the Insert Data Fields screen.
Operations used in Queries:
|
= |
Equal |
|
>= |
Greater than or equal to |
|
<= |
Less than or equal to |
|
<> |
Not equal to |
|
< |
Less than |
|
> |
Greater than |
|
LIKE |
Use LIKE with wildcard * - for example, Name LIKE "*/S* would pull everyone with a last name beginning with S. The "/S" is found somewhere in the field. (The slash is used to designate the S is the first letter in the last name, rather than anywhere in the name field.) |